skip to main |
skip to sidebar
I've got to believe that everyone, at some point, or hopefully at multiple points in their lives, have said to themselves, "Holy smokes --> Enter Your First and Last Name Here <--. You. Totally. Rock." It's a pretty awesome thing to be able to say to yourself. Lesson for this post is that it's healthy pat yourself on the back once in awhile, give yourself some cred, and appreciate what you do for you.
 I had roasted some beets last week and I really wanted to do something fun with them. Since they had already been sitting for awhile, I knew I had to eat them soon. I decided to just suck it up and do what I usually do with beets: make a simple beet and walnut salad w/ goat cheese. I had picked up some goat feta from Achadinha Cheese Company at the Ferry Building farmer's market last week, so that needed to be used up too. (REALLY great cheese, btw, made by Donna Pacheco. She only makes three kinds of cheese and a goat sausage, courtesy of her goats in Petaluma). As exciting as the beet and goat feta was, I've already done the salad so many times! BOR-ING. My limited motivation left me drinking two glasses of wine and nibbling on some bread and Cambazola cheese. The wine got me thinking (yes - I owe it all to the wine) - I remembered that I had really liked a beet burger from The Plant Cafe awhile back. Could I make it? Should I try? Even if it didn't turn out well, I still had wine and cheese as a back up dinner. (Hey! It's Monday! - don't judge!)

Here's how my brain worked this evening: Beets, check. Goat feta, check (for the burger topping of course). What else do I have? Red Onion? - sure! Carrots? - Why not? *shred...shred...shred in the food processor then transferred to bowl* ....Hmm...it needs something to mush it all together. I found a can of black beans - huh...that could work...?! *whirl whirl whirl in the food processor* It needs some liquid *add olive oil, whirl some more, add to bowl and mix* What else could I put in?!....Walnuts! - DUH! Window box herbs...hmmm...yum I think? We'll see... I'm on a health roll now. What else is healthy? Umm...flax seeds? Ok! Oatmeal? What the heck, why not? *more whirling of the food processor and add to bowl, mix mix* It looks like ground burger meat to me! =D. And so a patty was formed.......

Seriously, that's how it happened. Sandwiched between a honey whole wheat sesame bun left over from camping this past weekend, with some perfectly ripe avocado, butter lettuce from my veggie box, some radish sprouts for a bit of kick, and thinly sliced tomato. All of that resulted in: Holy smokes Kay Chu. You. Totally. Rock. Uh huh....that's right. I totally rock.
Ingredients
3 Large Beets roasted, peeled, cut in half
6 Small Nantes Carrots (or 2 large regular carrots) Peeled
1 Red Onion, cut in half and peeled, root removed
1 can black beans, drained & rinsed
2 Tbs olive oil
1/3 Cup Walnuts, chopped and toasted
2 Tbs fresh oregano, chopped
2 tsp fresh thyme, chopped
2 Tbs Flax Seeds
1/4 Cup Oatmeal
1 Tbs Salt (more or less to taste)
1/2 Tbs Pepper (more or less to taste)
Add-ons:
Goat Cheese
Avocado, sliced
Tomatoes, sliced
Lettuce
Aioli (I HIGHLY recommend the chipotle aioli with this!)
Radish shoots
Shred the beets, carrots and onion in a food processor. Transfer to a large mixing bowl. Switch to the blade attachment on the food processor, add in black beans and olive oil and process until in turns into a paste. Add beans to the shredded vegetables. Next, chop the walnuts, fresh herbs, flax seeds,and oatmeal in the food processor until crumbly. Add to the big mixing bowl. Mix everything well and form in to 6 patties about 4-5 inches in diameter.
Heat a non stick pan over med-high heat, and lightly grease the pan with some olive oil. Cook patties for about 3-4 minutes on each side, flipping once. Once the patties are cooked, flip one more time so you get the hot side of the patty, add cheese, turn of heat and put a lid on to melt the cheese. Meanwhile, prep the rest of your burger add-ons and toast the buns. Build the burger to your liking and ENJOY!
After making the Soy Sauce Chicken from my previous post - it would be an absolute sin to toss out the syrupy goodness left over. *Note: "Left over"...meaning only if you haven't already dumped the sauce over white rice and gobbled it up the next morning for breakfast...or for a midnight snack because you couldn't sleep thinking about it. That said, what do you do with this luxuriously silky sauce? You could mix a couple tablespoons of the stuff when making fried rice or toss into a broth to serve with noodles. As easy and delicious as those options sound, I recommend another option, using more goodies from Godfrey Family Farms: Eggs!

Similar to traditional Chinese tea eggs, the process involves using hard boiled eggs, lightly cracking the shell, submerging them into the sauce and allowing them to simmer for at least one hour and up to about 3 hours. Some people might automatically discount the thought of cooking an egg for so long, because eggs are indeed best consumed fresh with a just firmed white and slightly runny yolk (at least that's my opinion)...HOWEVER the result of this recipe is a savory soy sauce infused egg, that is both beautiful to look at and delightfully tasty. So - this recipe might actually be better applied to an older egg rather than a farm fresh one, but I really couldn't resist using the little freckled eggies when I made this.
Ingredients:
Left over sauce from Soy Sauce Chicken recipe - should be about 1/2 - 3/4 Cups
Water
4 - 6 eggs, hard boiled
With the back of a spoon, hit the egg shells so they're slightly cracked, but still in tact. Put the sauce and eggs In a medium pot and add enough water to just barely cover the eggs. Bring the sauce to a boil, then reduce to low for a soft simmer, keeping the lid on. Cook for 1-3 hours - add water as needed. When cooled, peel off the egg shells and enjoy!
Last Saturday, I went to pick up 2 farm fresh chickens and a dozen eggies (my term for ‘special’ eggs, that come straight from a local farm or my friends’ backyards) from a big white van in front of a Home Depot by my house. Totally random, right?..I know….but it was exhilarating! The thought of a farmer coming into your neighborhood to drop off chickens that he raised himself gets me SO excited! As I walked up to the big white van, there was an odd smell of, well….chickens and livestockyness. I’ll be honest and not ashamed to admit….I kind of appreciated the funk. I’m pretty sure that very few others would share the same sentiment about chicken funk, but it made me feel like this was the real deal. It was Brian Godfrey of Godfrey Family Farms who I met at the big white van, and he brought me the real deal – and that is what it was.

I ordered 2 chickens knowing that one would be given to my parents. My dad always said that he missed the good chicken flavor of ‘real’ chicken from his days in Hong Kong. I wasn’t sure if I knew what ‘real’ chicken tasted like – so I figured pastured finished chickens that walk around and eat grass and worms like they’re made to do, instead of hormones and who knows what would do the trick. I told my mom she needed to cook this Godfrey Family chicken and that my dad would be the judge of ‘real’ chickenness. My mom ended up making White Cut Chicken, which is, in my opinion, probably the most unadulterated way of enjoying fresh chicken, Cantonese style. It’s the whole chicken, poached in water with some ginger, garlic and salt, chopped into large pieces and served over white rice with a ginger scallion sauce. How simple, yet so incredibly divine! The verdict: Dad was happy. He and mom both got some ‘real’ chicken goodness.

As always, mom inspired me. I, too, wanted to make something super traditionally Asian to enjoy my chicken, so Soy Sauce Chicken is what first came to mind. The traditional way of making this recipe is to poach the chicken whole in soy sauce, but I wanted to save the carcass to make something else, so I butchered the chicken into 8 pieces: 2 thighs, 2 drumsticks, 2 wings, 2 breasts, and saved the carcass for future chicken goodness. The cut chicken pieces also help spread the chicken in a pan, so less soy sauce is needed to cover the chicken. Soy Sauce Chicken served over white rice with a side of braised bok choy and a drizzle of the chicken soy sauce – ummm….YES PLEASE! Cantonese soul food at its best!
Ingredients:
1 Cup Soy Sauce
1/3 Cup Rice Wine
1 stick of Chinese Brown Sugar*, can substitute using ~3/4 to 1 cup of brown sugar
1 cinnamon stick, whole
1 star anise, whole
2 inch piece of ginger, sliced thick and pounded
8 Pieces of chicken (any combination of thighs, drumsticks, wings, breasts)

Combine all the ingredients together, except the chicken, in a deep pan and cook over medium high heat. When all of the sugar has dissolved and the sauce is simmering, place the chicken, skin side down into the pan, trying to fit it all in one layer. Cover and cook for 3-4 minutes. Flip the chicken so that the soy sauce can color and flavor the other side of the chicken and continue to cook for another 3-4 minutes. Keep flipping and cooking 3 to 4 more times until the chicken is fully cooked and glazed with a deep brown color. The sauce should be the consistency of maple syrup. Serve the chicken hot over rice with a generous drizzle of the soy sauce.
*Chinese brown sugar, sometimes labeled “Brown Candy” can be purchased at most Asian markets. They come in stick form and if chopped into little pieces, can pretty much be eaten as candy. I used to sneak little pieces of it when my mom used it to make sugar filled mochi dumplings for Chinese New Year.
I love summer! Not only does the season produce my favorite fruits and vegetables, but it means longer days and warm evenings - conditions that practically begs for grilling. As you might know, I'm not much of a fan of big slabs of meat, but I can grill produce all day long. From portabellos to zucchini to peaches, the grill seasons everyday vegetables with summer goodness.
 How this recipe came about was a through a random act of desparation. I needed a side to pair with some pork shoulder that was about to be thrown on the grill. It had been marinating in red wine, garlic and rosemary. I didn't want rice or pasta, but I wanted something quick and I was too lazy to go to the grocery store. After digging through my pantry, I found a little purple box of Israeli cous cous. SCORE! From there, I had some vegetables on hand - zucchini, red onion, and roma tomatoes - MORE SCORE! Tossing everything together with a bit of fresh sweet basil - oh heaven. To complete the meal, I made some cold tzatziki (a future blog post) to accompany the grilled pork and the whole mish mash of goodness blended perfectly together. It was like a middle eastern thanksgiving on a warm summer sunday night.
Ingredients:
1 1/3 Cup Israeli Cous Cous
1 1/3 Cup Chicken broth, bring to a boil
1 Tbs Olive Oil
3 small zucchini, sliced lengthwise about 1/4 - 1/2 inch thick
1 red onion, cut into 8 wedges, leaving the root end holding each wedge together*
2 roma tomatoes, cut in half lengthwise
Olive Oil
Salt & Pepper to taste
1/4 Cup Sweet Basil - chiffonade
Start by cooking the cous cous. Heat olive oil in a pot, and toast the cous cous until lightly golden brown - about 5 minutes. Add the chicken broth (careful! - it will be SUPER bubbly and steamy), turn the heat down to medium - low, cover and cook until all the liquid has absorbed, about 10 - 12 minutes.
In the meantime heat the grill on high and prep the vegetables. Place the tomatoes cut side up, zucchini and red onion on a sheet pan. Drizzle olive oil over the vegetables and sprinkle salt and pepper. Once the grill put the vegetables on the grill. The zucchini will take about 2-3 minutes on each side. I like the onions a bit more caramelized, so i left them on for longer. The tomatoes should be put on the grill cut side down and grilled briefly for until there are grill marks
Once the vegetables are grilled and are cool enough to handle, roughly chop them up and add to the cooked cous cous with the basil. Salt and pepper to taste and drizzle with a bit more olive oil if desired.
*I like my red onions mostly cooked and a bit caramlized, so I cut the onion into eighths. You can cut into quarters if you like a bit of bite from the raw onion.
I've been really fortunate to have grown up with my mom as, well...my mom. She had dinner ready on the table every day and it was always a healthy & complete meal mostly consisting of white rice, a protein dominated dish (think steamed ground pork w/ chopped shitake mushrooms, or stir fried chicken of sorts), and a vegetable dominated dish. Wait...hold on just ONE sec....let me take back the "always" a healthy & complete meal. I will never forget that one time when we had popcorn and cheesecake for dinner (seriously)...but that's beside the point.

So back to the vegetable dominated dish, as a kid, I never understood why kids didn't like veggies. I always said that if kids had veggies the way my mom made them, there wouldn't be a problem. From bok choy to broccoli, she always managed to make it tasty. One of my favorite vegetables she made was peas. Not the little round single ones that you can get in frozen bags, but peas of the whole pod, like snow peas or sugar snap peas. I loved their crispy texture and the delicate sweetness that gave way at every bite. I'll also always have the fond memory of me and mom, sitting in front of the TV, preparing the peas for dinner. We'd mindlessly take peas from one pile and split them into 2 steadily growing piles. One was a pile of finished peas, ready to go into the wok, and the other pile was the tough ends and fibers that would get tossed away.
 Whether it was just peas by themselves or peas with shrimp, I knew dinner was going to be good. I also now know why we had them so often: they're quick and easy. If there was ever a dish that could carry the coveted title of a healthy, delicious, quick and easy recipe, stir fried peas would be it. Thanks, mom, for making things that are so simple, so memorable! Happy Mama's Day!!!
Ingredients
1 lb of sugar snap peas, rinsed and tough ends peeled off
1 Tbs ginger, peeled and julienned
1/2 Tbs garlic, minced
1 Tbs vegetable oil, split in half2 tsp toasted sesame oil
2 tsp toasted sesame seeds
Salt & White Pepper
Heat half of the vegetable oil in a pan pver medium high heat. Add ginger and cook for about 1 minute until fragrant. Add in snap peas and cook with a pinch of salt for about 2-3 minutes. *Here's my trick to getting yummy garlic flavor without burning it*
 Create a well in the pan with the peas. Pour the rest of the oil into the middle of the well and place garlic in the oil. Stir just the two ingredients to let the garlic infuse with the oil. Once the garlic becomes golden brown and fragrant, about 1 minute, mix in the peas. Remove pan from heat and stir in sesame oil. Salt and pepper to taste. Transfer peas to a serving bowl and sprinkle toasted sesame seeds on top. Total cooking time should be no more than 5 minutes or so to keep peas crisp.
I don't think I've ever communicated my love for chickens within this blog. Well - I LOVE CHICKENS. There, now you know. After reading Omnivore's Dilemma, In Defense of Food, and then watching Food Inc, I will forever only buy free range, pasture finished meat. Over sized chicken boobs for $1.99/lb? No thanks. I'll opt for paying a little more from a direct chicken farmer where I know the little chicadees are treated with some TLC. That place for me right now is Soul Food Farms. Every couple Wednesdays, I'll order and pick up my little fresh chicken and a dozen multicolored eggs ranging from a rich brown to baby blue, some even marked with the cutest freckles you've ever seen. For the first time last week, I also ordered 2 packets of their chicken confit which equates to 4 beautiful chicken legs that have been submerged in salt and warm duck fat then slowly cooked to practically perfection. When I pull it out of the fridge, all I have to do is put it on a skillet to crisp the skin - and voila, dinner is served. Need I say more? One day, when I garner enough duck fat from a place still unknown...I will attempt this fabulous feat of making my own delicious confit.
 What else am I loving right now? Umm...grilled artichokes. Why? They're in season, they're fun to eat, and it's hard to replicate the rich nuttiness that naturally comes out of that tender heart. Grilling gives me an excuse to be outside during the warm spring evenings, not to mention that it adds an additional depth of flavor to whatever you end up putting on the grill. What else would I want to pair with the yummy confit?

Oh...maybe something a little lighter to balance out the richness of everything else. I didn't have any salad greens and I was too antsy to get started with dinner to take the time to go to the store after work. Jicama and broccoli is what I had in my fridge, so jicama and broccoli is what I ate. Light, crisp and cool - a perfect pairing with the confit.
Ingredients
Chicken Confit - 2 legs (serves 2-3 people)
Grilled Artichokes w/ Herb Lime Dressing & Shaved Parmesan
4 small to baby sized artichokes
Juice of one Lime
2 Tbs fresh herbs, finely chopped
1/4 cup olive oil
2 tsp honey
Salt/Pepper to taste
Parmesan cheese, shaved
Jicama & Broccoli Salad
1/2 of a small jicama, diced
2 cups of broccoli florets
(uses the remaining dressing from the grilled artichokes)
Prepare the artichokes by cutting the tops off and trimming off the little leaves at the bottom. Steam then for 20-30 minutes until tender. In the meantime, make the dressing by combining the lime juice, herbs, and honey in a bowl and slowly add olive oil while whisking. Salt and pepper to taste and set aside
Using the same steamer as the artichoes, steam the broccoli florets for 3-4 minutes until tender. Remove from the steamer and allow to cool. Chop them up into little pieces and toss with the jicama, set aside
Heat the grill on high. Once the artichokes have cooled, slice in half lengthwise and gently remove the choke with a spoon if needed. Brush some of the dressing on each open half of the artichoke and put cut side down on the grill for 2-3 minutes or until brown.
As the artichokes are grilling, heat a sautee pan on medium-high heat, and place chicken confit skin side down for 4-5 minutes until the chicken is heated through and skin is crisp and brown.
To serve, toss the remaining dressing in with the jicama and broccoli. Salt and pepper the salad to taste. Shave parmesan over the top of the warm grilled artichokes and plate w/ crisped chicken confit.
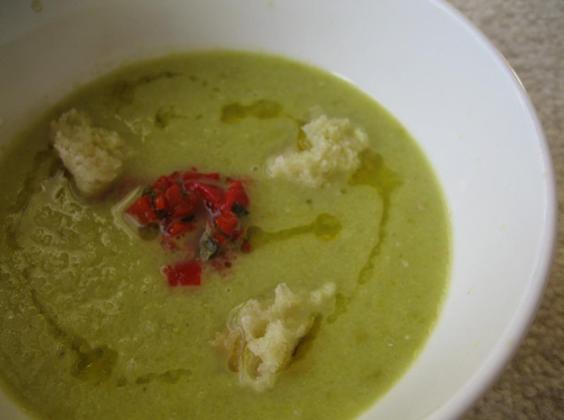
So it's been awhile since I've posted. Why? Because I lost my camera!!!! =( So sad...so so sad. I've been going through blogging withdrawals until I remembered that I have some pics (not as a pretty as I'd like, but pics none the less) of a Cucumber and Pea Gazpacho I made last summer. This recipe started out as a Cucumber Gazpacho from the Cesar cook book....so why does the title include peas? ........and so the story begins. I was having some friends over for dinner one night last year. It was after work, and I got off later than expected, so prep time was tight. In order to prepare all the menu items in time, I recruited my awesome boyfriend to help me out in the kitchen. I handed him a piece of paper: "Here, Aaron, a recipe for the the world's easiest soup. It's cucumber gazpacho. You don't need to cook it or anything 'cuz it's served cold. Just measure out all the ingredients, throw it in a bowl, stick a blender to it, throw it in the fridge, and done." It was the first time I've given him full control of a recipe for a dinner party, but it's just measuring and pouring and a little chopping, so I was sure he could handle it. Long story short - Lesson 1: 1 Cup of white wine vinegar does not equal 1/2 Cup. I look up from my slicing and dicing and look at the once new bottle of vinegar that is now about half full (see..I'm still a positive thinker here). Me: "Ummm....how much vinegar did you put in that?" Aaron: "ummm...." he looks at the recipe, then looks at the measuring cup....pauses, cocks his head to the left, "Oh shit". I didn't know whether to be upset or just laugh, so I just did the latter 'cuz Lesson 2: being upset just doesn’t solve anything.
At this point, the blender had already hit the bowl, so we couldn't exactly strain out the vinegar. We didn't have any more cucumber to double the recipe. Adding water would have made vinegar soup with cucumber essence. I needed a cold veggie that was slightly sweet and green. Think - think - think - Frozen peas!!!!! Lesson 3: Frozen peas are a good staple to have in the freezer whether it's for last minute veggie dishes, icing wounds, or fixing wounded veggie dishes. After doubling everything else in the recipe, the soup turned out great with a little bit of added sweetness from the peas, and tartness from the vinegar. Honestly – this is why I live to cook and eat. It’s an adventure everytime. For the record, I love having Aaron in the kitchen while I cook. He’s really good at chopping onions and playing the guitar for background music. Oh…and he makes the best sautéed leeks ever. Aaron – this post is dedicated to you.
Ingredients
4 cups peeled, seeded and coarsely chopped English Cucumbers (about 2 cucumbers)
4 cups frozen peas, thawed
1 1/4 Cups extra virgin olive oil
1 Cup ice water
1 clove garlic
1/2 cup white wine vinegar
2 Tbs lemon juice
2 tsp salt
1/4 tsp pepper
1/2 tsp cayenne pepper
Garnish:
Piquillo Pepper Relish:
1/2 Cup Piquillo peppers finely diced
2 Tbs fresh mint or basil
2 Tbs extra virgin olive oil
2 tsp red wine vinegar
Salt/Pepper
Fried Croutons
1 Baguette, torn into 3/4 in pieces
Extra Virgin Olive Oil
Make the relish. Combine the peppers, mint, oil and vinegar in a bowl and season to taste w/ salt and pepper. Let stand for at least half an hour before using
To make the soup, place half of each of the ingredients into a blender and blend. Set aside in a large bowl and repeat with remaining half. Cover and chill for at least one hour
To make the Fried Croutons, pour olive oil into a shallow pan until there's about 1/2 inch of oil. Heat the oil and place the torn baguette in a couple at a time, flipping over every minute, until golden brown. Set aside on paper towel.
To serve, pour the soup in a bowl and top each portion with a spoonful of the relish, a couple croutons, and a drizzle of extra virgin olive oil.
*sigh*....I LOVE summer. But wait...March has JUST begun! Summer?...March?...oh yes...one of the greatest reasons why I am so loyal to the golden state. On the last day of February 2010, the temperature was 68 and sunny, and I was wearing flip flops and a tank top, getting more than my daily required dose of Vitamin D au naturel on my friend's front porch. Are my friends in the north east and mid west jealous?... probably just a little. *sorry guys!*

Grilling party! So what to make? I will provide 100% transparency here and admit that it was a VERY slow Sunday morning due to a crazy Saturday night. That said, I was very limited on time, and the busy weekend didn't allow for any pre-planning or meat marinating, so I thought a basic coleslaw would be good - but no...too boring, and I wouldn't get to use the grill! So, I thought, what the heck, why not just throw the cabbage ON the grill? And thus, the grilled cabbage slaw was born. Caramelizing the cabbage on a hot grill would give it a rich nutty flavor. To brighten it up a bit, I had a barely used bunch of mint in the fridge that I could bring w/ me, peanuts would be great for crunch, and cilantro....just because I like cilantro.

As for the dressing, I needed to make do with what I had in the fridge which included miso paste and non-fat greek yogurt. In my rush to get to the party, I hopped out of the shower, wrapped myself in my bathrobe and ran to the kitchen. I literally just scooped a bunch of yogurt into a jar, spooned in some miso paste, and added in whatever other ingredients I thought would go well with it, then prayed. I slapped on the lid, shook it up, tasted it, adjusted and threw it in the fridge while I got ready. On the way out, I stopped by the closest grocery store, a little Korean market, to pick up the cabbage, cilantro, and peanuts. I had everything in hand, but couldn't for the life of me find peanuts! They carried bags of whole unshelled boiled peanuts...and unshelled roasted peanuts...raw shelled peanuts, but I just wanted a jar of ready to go roasted PEANUTS! Where's the peanut man with top hat and cane?! Why doesn't a Korean market have ready to go shelled peanuts!?!?! Even your average gas station has them! I almost wished I needed gas, but luckily I didn't, and found a fun substitute. Instead of a peanut man with top hat, I found little yellow circle man looking down on me with a big smile. He sat on a tall can full of crunchy sesame balls, each w/ a little peanut inside. Why not? The salad turned out great - a fun creation originating from lack of time....and lack of peanuts.

Ingredients
For the dressing (Note that the quantities should be viewed as 'more or less' due to the nature under which this dressing was created):
1 Cup Greek Yogurt
3 Tbs Miso Paste
3 Tbs Rice Wine Vinegar
2 Tbs Honey
2 Tbs Sesame Oil
1 tsp salt
1 tsp white pepper
1 tsp sriracha chili sauce
2 Tbs toasted sesame seeds
For the greens:
1 small green cabbage, quartered lengthwise, with the stem keeping each quarter in tact
1 small red cabbage, quartered the same way
Olive Oil
Salt & Pepper
1 bunch mint
1 bunch cilantro
1 can of sesame balls, lightly crunched up (or.....1.5 Cups of roasted salted peanuts)
1 lime, zest and juice
Throw all of the dressing ingredients into a jar and shake vigorously so that the honey and miso paste is dissolved and there are no clumps. Set aside in the refrigerator
Rub olive oil over each of the cabbage quarters, and season w/ salt and pepper. Place each quarter of cabbage on a hot grill cut side down for 2-3 minutes each or until there are grill marks. The grill should be covered. Remove from grill onto a cutting board and slice cabbage into thin strips
While the cabbage is grilling, chop cilantro and tear off the mint leaves in a large salad bowl. Add sliced cabbage and toss with all of the dressing. Add crunched up sesame balls (or peanuts), lime zest, lime juice and toss again until well combined.
Right now, I am eating while blogging. This is a first for me. Usually, I think, "Dood, there's no way I would interrupt quality time with my food. Writing comes after eating." But no, at this very moment, I'm practically licking dribbling creamy egg yolk from my bottom lip (and a little piece of rice) because I shoveled a bite in my mouth while the previous sentence was being created. I am so insanely excited about this recipe that I want to share it with the world ASAP.

 Patience is needed though - I need to preface this recipe by first giving credit where credit is due. I first saw this thumbnail of culinary magnificence on a blog that my blogger buddy Matt Litman reminded me of: Smitten Kitchen. I love this blog because her recipes are so approachable and her photography is absolutely beautiful. She could probably make my mouth water simply with an elegant photo of a green onion - my least favorite food ever. Anyway, I was flipping through her beautiful photography, and I came across one with a sunny side up egg over rice..........c'mon really? A fried egg. over white rice. with soy sauce? That was me and every asian kid's staple breakfast and dinner in college. So - naturally, I had to see what all the fuss was about and it led me to Mark Bittman's version of a Jean-Georges Vongerichten recipe. I watched Mark Bittman's video, and he referred to the final masterpiece as something like a "Deconstructed fried rice". Here's my second....."c'mon really?" Not everything needs to be deconstructed - this is chinese food, not a michelin star rated restaurant that also includes molecular gastronomy in their menu.
So tonight was the night that I would set my doubts aside and test greatness. My boyfriend is gone for a bachelor party weekend, and I'm cooking for one - perfect recipe for it. The verdict: Oh BOY do I stand corrected. This is a staple college dinner on steroids, and you can call it deconstructed or not.....it's FABULOUS. What makes it is the fried ginger and garlic crisps, along with the savory leeks and chewy sweet rice, mixed with creamy egg yolk. It's an amazing balance of flavors and textures - and it's SO easy to do. Before I go into the ingredients and everything else...I'm frying up another egg and going for seconds. Oh heaven.
Ingredients1/2 cup peanut oil (Jean-Georges apparently uses chicken fat......ummm...next time?)
2 tablespoons minced garlic
2 tablespoons minced ginger
Salt
2 cups thinly sliced leeks, white and light green parts only
4 cups day-old cooked jasmine rice
4 large eggs2 teaspoons sesame oil
4 teaspoons soy sauce
Add half of the oil into a medium pan over medium heat and add garlic and ginger. Swirl the pan around occassionally until the bits are crisp and brown. Using a slotted spoon, transfer the garlic and ginger onto a paper towel. Reserve the oil.
 In another pan, add the remaining oil over low-medium heat, add leeks, a pinch of salt and cook until tender and lightly brown. Add the rice and stir until heated through. To add more flavor, drizzle a bit of the reserved oil from the ginger and garlic and stir well. Salt to taste.
In a nonstick skillet over low-medium heat, fry the eggs sunny side up. To serve, scoop 1/4 of the rice on a plate, top with one egg, drizzle sesame oil and soy sauce over the dish, and finish with a generous sprinkling of crisp ginger and garlic.

I'm starting off this post by saying that I'm not a mayo person. I end up scraping it off sandwiches if there's too much of it, I'd rather use olive oil and vinegar in my tuna salads, potato salads, etc... But aioli (prounounced EYE-OH-LEE).....for some reason, it's a different story. Perhaps because it's got a fancy name - or when I have it, it's usually from a restaurant so I have this vision in my head of them whipping it up from scratch vs. squeezing off-white goop out of a bottle. Plus, it's flavored! - usually with garlic.....which....mmmm.....I'm speechless.
I've got a dinner party to go to tonight! It's BYOB - Build Your Own Burger. Everyone just brings their own fave burger building yummies - avocado, mushrooms, onions, cheese, etc - whatever the heck you want and we just make various different sliders. I'll probably go to the store to pick up a couple of avocados and onions for caramelizing but I wanted to make something special and different. So - I thought - AIOLI. Plus, we're having sweet potato fries, and it'd be perfect for dipping!
To increase variety, I ended up making a big batch of it, then flavored it three different ways: Smoked Paprika and Chipotle, Garlic, and Pesto. Yum yum yum yum yum....that, spread on a mini dinner roll, with a flat beefy meatball. HOORAH! How could you go wrong!?!?
 Before I get into all the ingredients and such - note: if you're the one making the aioli, I guarantee that you'll burn the calories you'll end up consuming. It requires a good amount of elbow grease.
Ingredients
1 Egg Yolk
1 pinch salt2 Cups Olive Oil
2 Tbs Lemon Juice
Salt and Pepper to taste
2 tsp Smoked Paprika
1 tsp Chipotle
1 clove garlic - mashed
3 tsp pesto
In a medium bowl, whisk together egg yolk and salt until well combined. SLOWLY - starting with one or two drops at a time, add the olive oil. Whisk consistently. Once you've started the emulsion, it should look a little thicker and a bit more opaque than the egg yolk you started out with, you can start drizzling the olive oil in a thin steady stream, while whisking the whole time. Alternate drizzling the olive oil and lemon juice depending on the consistency you want. Once all the olive oil incorporated, separate the aioli base into three different containers. Mix the Smoked Paprika/Chipotle, Garlic Clove and Pesto in each separate bowl. Keep refrigerated until serving.
Happy 2010!!! ("Twenty Ten"....NOT "Two Thousand Ten"....for those who are still trying to figure out what to call it). So the holiday season of 2009 has officially come to an end..and over the time frame of approximately 2+ months, I've been busy eating, and eating, and eating...oh and eating. I ate A LOT. No exaggeration here. Between work and my birthday and my family and my boyfriend's family, and friends, there was constant consumption of a whole lotta food - eaten with joy and happiness, of course. But between the holiday dinners, lunches, parties, and unsuccessfully trying to eat light when meals were eaten at home (of course due to all the holiday cookies and treats that were shared), it's definitely time to change up the diet a little bit....at least for the time being. That said, week one of 2010 will be all healthy vegetarian. This will be hard because every time I open the freezer, a big tupperware of leftover ginormous juicy meatballs in homemade marinara sauce that had simmered over night (courtesy of my boyfriend's aunt) will be staring straight at me. Also - I need to add "healthy" in the first week of vegetarianism...because frankly, I could define vegetarian as gorging on cheese and chocolate all day.
 Kicking off healthy vegetarian week, I decided to go the Indian food route. Daal - lentils - are such a great source of both carbs and protein. They're easy to make and you can make a big pot of it and eat it throughout the week. I LOVE making indian food because the spices add so much flavor, it's ultra satisfying without needing to add a lot of fat. I need to take some time here to caveat though - I didn't follow a recipe of any sort, I just kind of know a general process for making it, and added various spices that I personally like in indian cooking. I used red lentils - masoor daal - and added various spices to it.
Here's the combination of flavors I used starting from the upper left going clockwise: Mustard seeds, Cumin Seeds, Coriander Seeds, Garam Masala, Turmeric, Ginger (didn't have fresh ginger on hand so I used ground), Chili Powder

Ingredients
2 Cups of Masoor Daal
1 tsp Turmeric
6 Cups of water, plus more
4 Tbs Vegetable Oil or Ghee
1 onion, thinly sliced (clarified butter)
4 cloves garlic, minced
1 tsp mustard seeds
2 tsp whole cumin seeds
1 tsp whole coriander seeds
1 tsp garam masala
1 tsp ginger (ground...but fresh ginger is preferred: ~1 inch piece, grated)
1 tsp chili powder
2 Tbs salt (more or less to taste)
1 Tbs pepper
1 bunch fresh cilantro, chopped
Rinse the lentils well and pick out any little rocks, etc...that might be hiding in the lentils. Cook the lentils w/ water and Turmeric in a big pot over medium high heat. Stir occasionally so the lentils don't stick to the bottom and continue to add water to desired consistency.
Meanwhile, use a pestle and mortar to grind up all the spices together. Sautee the onion in a pan with the oil or ghee (make sure not to burn the onions!!!) - add the ground spices and garlic and cook over a medium heat until the the mixture is fragrant. The onions and garlic should be soft and the spices lightly toasted.
Once the lentils are soft and cooked through, add the onion, garlic and spice mixture into the pot and stir. Simmer for another 5-10 minutes, stirring occasionally until all the flavors are blended together. Add salt and pepper to taste. Before serving, stir in the cilantro. Serve over rice or with naan.
The first time I've ever had fried goat cheese was at Chaya Brasserie in San Francisco. Ummmm...what can I say about it? Everything and nothing all at the same time. That was about 5 years ago. I've had it multiple times since then, and it just occured to me recently that I could make it myself - and boy was it easy...and WAY less expensive than ordering it at Chaya. My boyfriend calls it "fancy mozzarella sticks". Yeah, pretty much....same concept, but much MUCH more delectible.


In this salad, I paired the warm creamy goat cheese with sweet roasted beets and toasted walnuts. I also had some homemade bagel croutons that I threw in to give it extra crunch, and served it with a drizzle of homemade citrus vinaigrette.
Ingredients
One small log of goat cheese, slicked into 1/2 inch discs
1/3 C Flour
1 Egg, whisked
2 tsp water
1/3 C cornmeal (Can also substitute bread crumbs, but the crunch of cornmeal is fun)
1 tsp garlic powder
1/4 tsp cayenne pepper
3 Tbs toasted sesame seeds
Salt & Pepper
Olive Oil
Put the Flour, egg and cornmeal in 3 separate dishes. Add the water to the egg, and whisk together. Add the garlic powder, cayenne, sesame seeds, and a generous pinch of salt and freshly ground pepper into the cornmeal and mix.
In a small saute pan, heat up enough oil so that it's deep enough to reach at least 1/4 of the way up the side of the disk - about 1/4 inch deep. Make sure the oil is hot enough by sprinkling some flour in the oil. If it sizzles, it's hot enough, but make sure the oil doesn't smoke.
Working with one or two goat cheese discs at a time, first cover each disc with flour and pat of the extra flour. Next, dip it in the egg, making sure that the whole disc is covered, then toss it around in the cornmeal. Gently place breaded goat cheese in the hot oil and cook for one to two minutes each side, taking care when flipping so the crust doesn't puncture. Once the goat cheese is golden brown, set aside on a paper towel and serve warm on top of the already prepared salad.
I was browsing Food Network magazine the other day and came across a recipe for horchata. I don't know why it never occurred to me that I could make my own horchata. I LOVE the stuff! Sweet, cinnamon-y rice milk. Yum yum yum! The perfect balance for any spicy Mexican meal. After reading through the recipe, I didn't think it could possibly be that easy, so I went online to see if there were other variations. I found a recipe from Emeril Lagasse that included blanched almonds in it - which I think would add the creaminess that the other recipe may have lacked, so I decided to go with that one.
 In the process of making the horchata, I realized that I had run out of sugar - so I used some powdered sugar instead. I think that added to the texture a bit to make it even more silky, since creamy sweet frosting is just powdered sugar and a tiny bit of liquid. In any case, it came out DELICIOUS. It's an easy recipe to follow, but a little time consuding since it has to sit over night. It definitely tested my patience - I couldn't wait to take a giant gulp of it.
Ingredients
8 Tbs long grain rice
1 Cup blanched almonds
zest of 1/2 lime
1 tsp cinnamon (I ended up adding more)
3 Cups hot water, 4 cups cold water, divided
1 to 1 1/2 C of sugar (depending on taste)
Vanilla extract to taste (~ 1tsp)
In a blender or food processor, finely grind up the rice - as fine as you can possibly get it. The finer the rice, the better the horchata. Put it in a large pitcher and add in the almonds, lime, and cinnamon. Add three cups of boiling water, stir, and let sit over night.
The next day, blend the mixure until it's as smooth as possible. Add 2 Cups of cold water and blend until combined. Using a fine strainer or strainer and cheese cloth, allow the liquid to strain through. (I strained it 3 times because I didn't have cheese cloth). Add a 2 more cups of cold water and mix thoroughly. Add Sugar and vanilla, and a little bit more cinnamon if you'd like. Stir well until the sugar has completely dissolved. I had to let the horchata sit in the fridge for a little while in order for the sugar to fully dissolve and all the flavors to meld together. Serve cold, over ice.
Love, love, LOVE summer time!I mean, kale and chard in the winter is great and all, but nothing beats the bright colorful flavors of summer. The combination of the warm weather with sweet, in season corn, and cool tender zucchini screams summer time to me. It’s probably one of my favorite salads to make, and it’s so versatile! You can add anything you want to it. My first corn & zucchini salad had thyme and lemon zest with a simple lemon juice and olive oil dressing. In this version, I served it as a light and fresh side to grilled fajitas, so a Latin twist was in the stars for this recipe

Ingredients:
2 ears of corn, boiled and kernels cut off
2-3 small zucchini, diced to the size of corn kernels (more tender than the big ones)
1 red bell pepper, diced to the size of corn kernels
1 jalapeno, seeds removed, finely diced
½ Cup cilantro, chopped
Zest of one lime
Juice of one lime
5 Tbs Olive oil
Salt & Pepper to taste
Toss all of the ingredients together, and season with salt and pepper to taste. Yes, it’s THAT easy.
Side note: Feel free to play around with the amount of each ingredient to your taste!
 It breaks my heart when I hear people say that they don't like chicken drumsticks. "It's too fatty." "There's a bone in it." "It's 'dark' meat...I don't like the concept of that." ARE YOU KIDDING ME!?!?!? First excuse on the fattiness - ok, I can kind of accept that, but fat also = flavor. It's not like you're eating a stick of butter. Second excuse: a chicken was an animal. Animals have bones. You may as well eat worms if you're scared of bones. When cooking meat with bones in it you retain moisture and flavor. The third excuse....don't even get me started. Let's just stick with the scientific explanation that dark meat is dark because of myoglobin. Chickens need to run *or..at least chickens who aren't locked up in cages*....so their legs need more oxygen. Myoglobin stores oxygen and that's what gives dark meat its color.
So science and being irked by non drumstick eaters aside....I obviously enjoy eating it. It's inexpensive, juicy and is incredibly flavorful. I've cooked it various different ways, but this is my first time breading and baking. Let's just say I'll definitely do it again. I found a couple recipes and didn't like any one of them so I took bits and pieces from various recipes and made it my own. All the herbs I used are fresh from my garden and the bread crumbs are from
an old hunk of bread that I put in the food processor.
Ingredients:
8 Chicken Drumsticks
1/4 C Dijon Mustard
3 Tbs Mayonnaise
1 Tbs Worcesterchire Sauce
A Splash or two of Tobasco Sauce
1/3 C Plain Bread Crumbs
1/3 C Cornmeal
1/4 tsp cayenne
1/2 tsp chili powder1 1/4 tsp fresh Rosemary
1 1/4 tsp fresh Thyme
1 1/4 tsp fresh Oregano
1 1/4 tsp fresh Sage
Preheat oven to 400 degrees F. In small bowl, mix together the mustard, mayonnaise, worcestershire sauce and tobasco. In another dish combine bread crumbs, cornmeal, cayenne and chili powder. Chop up the fresh herbs all together and toss it in with the dry cornmeal/breadcrumb mixture. Working with one drumstick at a time, and using your hands, spread a thin layer of the mustard/mayo mixture all over the drumstick, then put it in the breadcrumb mixture, making sure to have the whole piece of chicken covered. Arrange the breaded chicken on a baking sheet and bake for 40 minutes. When you poke a knife into it, the juice should come out clear (not pink). Let sit for a couple minutes (if you can wait that long - because I couldn't and ended up burning my tongue), and serve warm.
How do you pass up live, fresh lobster that are being sold at $7.99/lb. Simple - you just don't do it. *Thank you, Chowhounders for the food news updates!!!* Just the week before, I picked up 2 live crab off a boat in Bodega Bay ($6.99/lb), and steamed it with ginger and scallions (Here's a recipe for it from one of my fave blogs - Appetite for China). After that episode of fresh seafood - I was desperately craving lobster!!! Yumyumyumyumyumyumyumyum....=D.

 Lucky for me, it was my dad's birthday - so I had a 'real' reason to splurge! - not that I needed a reason for $7.99/lb lobster. I ended up buying 3 lobsters that were just under 2 lbs each. Look - they're staring at you..saying "If you put me in boiling lemony water - I will forever hate you - but you will be forever pleased with my sweet and juicy meat, so I don't blame you."

Most people just eat the tail and the big claws, but there's actually a lot of delicious tender meat in the head and their skinny little legs, so I just decided to cook the whole damn thing - why not, right?
Ingredients
Lobster (in this case, 3 whole)
1 whole lemon - cut in half
1/4 Cup of Butter (1/2 a stick)
1 sprig rosemary, minced
2 garlic cloves, minced
Lemon wedges for serving
Boil a big pot of water and squeeze the juice of a whole lemon into it. Throw in the lemon halves for flavor. Submerge each the lobster under the boiling water for 1-1.5 minutes - until the lobster has turned orange and stops moving. =( You don't want to fully cook the lobster at this stage. If doing one lobster at a time - make sure the water comes back to a boil before putting in the next lobster.
After boiling, run it under cold water or submerge into a bucket of ice water to stop the cooking. Peel off the large claws and set aside to get it out of your way. Using a large knife, slice each lobster length wise using the bottom side of the lobster as a guide - in between its legs and down the middle of the tail. Clean out the guts and rinse it out a bit w/cold water. Let the water drain.
 In the meantime, prepare the herbed butter. Mix the minced rosemary and garlic in with the butter and put it in the microwave until all the butter is melted (30 - 40 seconds). This allows the flavors of the garlic and rosemary to seep into the butter. Brush the garlic herb butter evenly on the open sides of the 6 lobster halves. Place cut side down onto a HOT grill for 3-4 minutes until the the meat is browned. While the halves are grilling, also place the claws on the grill - they'll take a total of 6-8 minutes to cook (3-4 minutes on each side).
 Before serving, crack the shells of the claws using a mallot, and serve with lemon wedges.
This post is LONG over due. I made these cookies a couple months back after buying a bag of poppy seeds at random from a local european specialty food store. I went into the store wanting to buy something I had never purchased before since the store had so many unusual items like cured meats with weird names I had never heard of to sauces that were completely foreign to me. What I came out with was a bag of poppy seeds, a mug of mustard (yes, a mug....), and a few other little snacks.
I asked the lady at the counter what she'd make with poppy seeds and mustard, and she suggested, in a very heavy German-like accent, *I could barely understand her*....that a great recipe her mom made was to spread a thin layer of mustard all over a whole fish, stuff the inside w/ avocado and lemon, and sprinkle poppy seeds over it. Mustard Avocado & Poppy Seed Fish. It sounded great - but I wasn't in a fishy mood - that might be another post one of these days..... I'm familiar with poppy seeds in lemon poppy seed cake, muffins, etc...so I figured I'd stick to familiarity before venturing off into foreign territory. I found a recipe online for Lemon Poppy Seed cookies that sounded pretty good. I had fresh oranges to spare as well - so why not mix lemon and orange and make it my own! The came out sweet, slightly tart and deliciously cakey/chewy!


Ingredients:
1/2 Cup (1 stick) unsalted butter at room temperature
1 Cup granulated sugar
2 large egg yolks
1 tsp vanilla
1.5 tsp lemon zest
1.5 tsp orange zest
1/2 Tbs lemon juice
1/2 Tbs orange juice
2 Tbs Poppy Seeds
1/2 Cup Sour Cream
2 Cups all purpose flour
2 tsp. baking soda
1/4 tsp salt
Frosting:
1 Cup powdered sugar
1/2 Tbs lemon juice
1/2 Tbs orange juice
Heat oven to 350 degrees F. In a mixing bowl, cream butter and sugar. Add egg yolks and vanilla and blend. Add the citrus zest, poppy seeds and sour cream and mix until combined. In a separate bowl, combine flour, baking powder, baking soda and salt. Add to creamed mixture. Scoop 2 tablespoons of dough and roll to form each cookie. Drop them onto un-greased cookie sheets - keeping the about 2 inches apart. Bake until the cookes are lightly browned - about 18 minutes. Let the cookies cool before icing.
For the icing: Put powdered sugar into a bowl and mix in citrus juices until smooth. Dip the top of the cookies and let it drip before placing it down to allow it to harden.
Makes about 20 cookies
I opened my produce box last week and to my horror, I found a humongous bunch of scallions. Yucky yuck yuck. Ok - they weren't ugly or anything - quite beautiful actually, with pretty shades of purple, white and green.
 But if you know me, you know I hate scallions. When I was little, I'd pick them out of my fried rice, spoon it out of bowls of congee, and spit it out after taking a sip of miso soup. I gagged when I ate them. To this day, I pick them out whenever I can. When I tell people this little fact about me, they think I'm crazy because I like to eat pretty much everything. This next little tidbit is probably even more odd. Despite my hatred for scallions - there are only 2 ways I eat them. In both ways - they are used as the MAIN ingredient and can possibly be 2 of my favorite foods. Weird, right? I know. One of them is ginger scallion sauce, which I love to mix with white rice and gobble up, and the other is scallion cake. Hot, flaky, chewy and salty little pastries that have an incredible green onion flavor that I happen to love.

Ingredients:
2 Cups all purpose flour
1/2 cup boiling water
1/2 cup room temperature water
1/4 tsp baking powder
1/4 tsp salt4 scallions chopped into little pieces
A little bowl of salt - course preferred
A little bowl of corn oil
In separate bowls, mix together 1 Cup of flour with the boiling water, and the remaining cup of flour with room temperature water. Once each mixture is mixed well, combine the 2 together and knead until it's fully combined. Place the dough in a bowl, cover with plastic wrap, and allow to rest for one hour. In the meantime, chop up the scallions.
 Cut the dough into 12 equal pieces. Working with one piece at a a time, roll the dough into a circle that's about 1/8 inch thick. Using a brush, generously brush the dough with oil. Sprinkle a pinch of salt evenly over the dough, then sprinkle with chopped green onions. See picture for amount of green onions. (I know, I'd NEVER put that amount of scallions straight into my mouth). Roll up the dough length wise into a log. Then roll the log into a circle. Once a circle is formed, press it down flat. Some onions will ooze out, but that's OK. Repeat with remaining 11 pieces of dough.

 Once all the cakes are formed, heat a non-stick pan over medium heat. Cook the cakes for about 3 minutes on each side or until golden brown. Serve warm.
I think cauliflower is totally under-rated. It doesn't get the praise that other vegetables get because it's not brightly colored, or super flavorful, or filled with uber amounts of vitamins and antioxidants. It's a plain white lumpy thing (although they do come in different shapes and colors...but that's another post...) whose flavor is slightly sweet and mild. Little does one know that it's a good source of fiber and is high in Vitamin C. My mom always said that if you eat things that look like a brain - you'll be smarter. I believe it. Walnuts, pecans, cauliflower....etc. Moms are always right. That being said, when I found a humongous head of cauliflower in my box last week, I pondered over the many options of cauliflower dishes I could make to make me smarter. I tasted some cauliflower soup at Town Hall restaurant a couple months back, so I decided I'd make my own. I had some frozen artichokes I bought on a whim when I was starving and grabbing everything off the shelves that looked good - so why not throw some in the soup too! The result was a creamy and savory soup that had an everlasting flavor of that wonderful artichoke sweetness. I think roasting the cauliflower and artichoke hearts were key - it added a level of richness that I don't think would have existed if I had just boiled vegetables in the chicken broth.
Ingredients:
1 Large head of cauliflower - cut into little flowerettes
2 Cups of frozen artichoke hearts
3 Tbs olive oil
1 small onion - chopped
1 clove garlic - minced
4 cups chicken broth (or vegetable broth if you prefer)
1 cup whole milk1/2 Tbs thyme leaves
1 tsp lemon zest
Salt & Pepper to taste
Pre-heat oven to 425 degrees. On a baking sheet, toss the cauliflower and artichoke hearts in a tablespoon of olive oil and sprinkle with a bit of salt. Spread it on the baking sheet in one layer and bake for 25-30 minutes until it cauliflower starts to brown. Remove from oven and set aside.
 In a big pot under medium low heat, cook the onions and garlic until soft. Throw in the roasted cauliflower and artichoke stir. Pour in chicken broth and stir. Turn the heat to high and bring to boil. Once boiling, bring the heat back to medium low and allow to simmer for 15 minutes with the lid on. Add in thyme leaves and simmer for another 5 minutes. Remove from heat and puree the soup. (Using an immersion blender or ladle into a blender). Stir in milk and lemon zest. Add salt and pepper to taste.
Aaah - Spring cleaning! I haven't cleaned like this since.....I moved into my place three years ago! I set aside things for donation (i.e. an old high school winter ball gown and graduation gown....umm...yeah - those needed to go - I was saving them in case any halloween costume ideas came up), and threw away a bunch of stuff that I would be embarassed for anyone else to have. All that work got me hungry during mid-afternoon and I needed a pick me up. While I was cleaning, I concocted up this yummy in my head. One of my favorite snacks is apples and peanut butter - so why not throw in another a favorite? I had recently picked up my favorite granola - blueberry flaxseed - and it was waiting to be munched on. Oh yum! I felt like a little kid putting it all together. It was fun, easy - and delicious too!
 Ingredients
1 apple - preferably sweet and crisp - cored and cut into eighths
2-3 Tbs peanut butter - depending on how big the apple is
1/4 C Granola (any kind will do)
Spread peanut butter on one cut side of each apple slice. Press the peanut butter side down into the granola - repeat w/ all eight slices.




 Posts
Posts

