skip to main |
skip to sidebar
I've got to believe that everyone, at some point, or hopefully at multiple points in their lives, have said to themselves, "Holy smokes --> Enter Your First and Last Name Here <--. You. Totally. Rock." It's a pretty awesome thing to be able to say to yourself. Lesson for this post is that it's healthy pat yourself on the back once in awhile, give yourself some cred, and appreciate what you do for you.
 I had roasted some beets last week and I really wanted to do something fun with them. Since they had already been sitting for awhile, I knew I had to eat them soon. I decided to just suck it up and do what I usually do with beets: make a simple beet and walnut salad w/ goat cheese. I had picked up some goat feta from Achadinha Cheese Company at the Ferry Building farmer's market last week, so that needed to be used up too. (REALLY great cheese, btw, made by Donna Pacheco. She only makes three kinds of cheese and a goat sausage, courtesy of her goats in Petaluma). As exciting as the beet and goat feta was, I've already done the salad so many times! BOR-ING. My limited motivation left me drinking two glasses of wine and nibbling on some bread and Cambazola cheese. The wine got me thinking (yes - I owe it all to the wine) - I remembered that I had really liked a beet burger from The Plant Cafe awhile back. Could I make it? Should I try? Even if it didn't turn out well, I still had wine and cheese as a back up dinner. (Hey! It's Monday! - don't judge!)

Here's how my brain worked this evening: Beets, check. Goat feta, check (for the burger topping of course). What else do I have? Red Onion? - sure! Carrots? - Why not? *shred...shred...shred in the food processor then transferred to bowl* ....Hmm...it needs something to mush it all together. I found a can of black beans - huh...that could work...?! *whirl whirl whirl in the food processor* It needs some liquid *add olive oil, whirl some more, add to bowl and mix* What else could I put in?!....Walnuts! - DUH! Window box herbs...hmmm...yum I think? We'll see... I'm on a health roll now. What else is healthy? Umm...flax seeds? Ok! Oatmeal? What the heck, why not? *more whirling of the food processor and add to bowl, mix mix* It looks like ground burger meat to me! =D. And so a patty was formed.......

Seriously, that's how it happened. Sandwiched between a honey whole wheat sesame bun left over from camping this past weekend, with some perfectly ripe avocado, butter lettuce from my veggie box, some radish sprouts for a bit of kick, and thinly sliced tomato. All of that resulted in: Holy smokes Kay Chu. You. Totally. Rock. Uh huh....that's right. I totally rock.
Ingredients
3 Large Beets roasted, peeled, cut in half
6 Small Nantes Carrots (or 2 large regular carrots) Peeled
1 Red Onion, cut in half and peeled, root removed
1 can black beans, drained & rinsed
2 Tbs olive oil
1/3 Cup Walnuts, chopped and toasted
2 Tbs fresh oregano, chopped
2 tsp fresh thyme, chopped
2 Tbs Flax Seeds
1/4 Cup Oatmeal
1 Tbs Salt (more or less to taste)
1/2 Tbs Pepper (more or less to taste)
Add-ons:
Goat Cheese
Avocado, sliced
Tomatoes, sliced
Lettuce
Aioli (I HIGHLY recommend the chipotle aioli with this!)
Radish shoots
Shred the beets, carrots and onion in a food processor. Transfer to a large mixing bowl. Switch to the blade attachment on the food processor, add in black beans and olive oil and process until in turns into a paste. Add beans to the shredded vegetables. Next, chop the walnuts, fresh herbs, flax seeds,and oatmeal in the food processor until crumbly. Add to the big mixing bowl. Mix everything well and form in to 6 patties about 4-5 inches in diameter.
Heat a non stick pan over med-high heat, and lightly grease the pan with some olive oil. Cook patties for about 3-4 minutes on each side, flipping once. Once the patties are cooked, flip one more time so you get the hot side of the patty, add cheese, turn of heat and put a lid on to melt the cheese. Meanwhile, prep the rest of your burger add-ons and toast the buns. Build the burger to your liking and ENJOY!
After making the Soy Sauce Chicken from my previous post - it would be an absolute sin to toss out the syrupy goodness left over. *Note: "Left over"...meaning only if you haven't already dumped the sauce over white rice and gobbled it up the next morning for breakfast...or for a midnight snack because you couldn't sleep thinking about it. That said, what do you do with this luxuriously silky sauce? You could mix a couple tablespoons of the stuff when making fried rice or toss into a broth to serve with noodles. As easy and delicious as those options sound, I recommend another option, using more goodies from Godfrey Family Farms: Eggs!

Similar to traditional Chinese tea eggs, the process involves using hard boiled eggs, lightly cracking the shell, submerging them into the sauce and allowing them to simmer for at least one hour and up to about 3 hours. Some people might automatically discount the thought of cooking an egg for so long, because eggs are indeed best consumed fresh with a just firmed white and slightly runny yolk (at least that's my opinion)...HOWEVER the result of this recipe is a savory soy sauce infused egg, that is both beautiful to look at and delightfully tasty. So - this recipe might actually be better applied to an older egg rather than a farm fresh one, but I really couldn't resist using the little freckled eggies when I made this.
Ingredients:
Left over sauce from Soy Sauce Chicken recipe - should be about 1/2 - 3/4 Cups
Water
4 - 6 eggs, hard boiled
With the back of a spoon, hit the egg shells so they're slightly cracked, but still in tact. Put the sauce and eggs In a medium pot and add enough water to just barely cover the eggs. Bring the sauce to a boil, then reduce to low for a soft simmer, keeping the lid on. Cook for 1-3 hours - add water as needed. When cooled, peel off the egg shells and enjoy!
Last Saturday, I went to pick up 2 farm fresh chickens and a dozen eggies (my term for ‘special’ eggs, that come straight from a local farm or my friends’ backyards) from a big white van in front of a Home Depot by my house. Totally random, right?..I know….but it was exhilarating! The thought of a farmer coming into your neighborhood to drop off chickens that he raised himself gets me SO excited! As I walked up to the big white van, there was an odd smell of, well….chickens and livestockyness. I’ll be honest and not ashamed to admit….I kind of appreciated the funk. I’m pretty sure that very few others would share the same sentiment about chicken funk, but it made me feel like this was the real deal. It was Brian Godfrey of Godfrey Family Farms who I met at the big white van, and he brought me the real deal – and that is what it was.

I ordered 2 chickens knowing that one would be given to my parents. My dad always said that he missed the good chicken flavor of ‘real’ chicken from his days in Hong Kong. I wasn’t sure if I knew what ‘real’ chicken tasted like – so I figured pastured finished chickens that walk around and eat grass and worms like they’re made to do, instead of hormones and who knows what would do the trick. I told my mom she needed to cook this Godfrey Family chicken and that my dad would be the judge of ‘real’ chickenness. My mom ended up making White Cut Chicken, which is, in my opinion, probably the most unadulterated way of enjoying fresh chicken, Cantonese style. It’s the whole chicken, poached in water with some ginger, garlic and salt, chopped into large pieces and served over white rice with a ginger scallion sauce. How simple, yet so incredibly divine! The verdict: Dad was happy. He and mom both got some ‘real’ chicken goodness.

As always, mom inspired me. I, too, wanted to make something super traditionally Asian to enjoy my chicken, so Soy Sauce Chicken is what first came to mind. The traditional way of making this recipe is to poach the chicken whole in soy sauce, but I wanted to save the carcass to make something else, so I butchered the chicken into 8 pieces: 2 thighs, 2 drumsticks, 2 wings, 2 breasts, and saved the carcass for future chicken goodness. The cut chicken pieces also help spread the chicken in a pan, so less soy sauce is needed to cover the chicken. Soy Sauce Chicken served over white rice with a side of braised bok choy and a drizzle of the chicken soy sauce – ummm….YES PLEASE! Cantonese soul food at its best!
Ingredients:
1 Cup Soy Sauce
1/3 Cup Rice Wine
1 stick of Chinese Brown Sugar*, can substitute using ~3/4 to 1 cup of brown sugar
1 cinnamon stick, whole
1 star anise, whole
2 inch piece of ginger, sliced thick and pounded
8 Pieces of chicken (any combination of thighs, drumsticks, wings, breasts)

Combine all the ingredients together, except the chicken, in a deep pan and cook over medium high heat. When all of the sugar has dissolved and the sauce is simmering, place the chicken, skin side down into the pan, trying to fit it all in one layer. Cover and cook for 3-4 minutes. Flip the chicken so that the soy sauce can color and flavor the other side of the chicken and continue to cook for another 3-4 minutes. Keep flipping and cooking 3 to 4 more times until the chicken is fully cooked and glazed with a deep brown color. The sauce should be the consistency of maple syrup. Serve the chicken hot over rice with a generous drizzle of the soy sauce.
*Chinese brown sugar, sometimes labeled “Brown Candy” can be purchased at most Asian markets. They come in stick form and if chopped into little pieces, can pretty much be eaten as candy. I used to sneak little pieces of it when my mom used it to make sugar filled mochi dumplings for Chinese New Year.
I love summer! Not only does the season produce my favorite fruits and vegetables, but it means longer days and warm evenings - conditions that practically begs for grilling. As you might know, I'm not much of a fan of big slabs of meat, but I can grill produce all day long. From portabellos to zucchini to peaches, the grill seasons everyday vegetables with summer goodness.
 How this recipe came about was a through a random act of desparation. I needed a side to pair with some pork shoulder that was about to be thrown on the grill. It had been marinating in red wine, garlic and rosemary. I didn't want rice or pasta, but I wanted something quick and I was too lazy to go to the grocery store. After digging through my pantry, I found a little purple box of Israeli cous cous. SCORE! From there, I had some vegetables on hand - zucchini, red onion, and roma tomatoes - MORE SCORE! Tossing everything together with a bit of fresh sweet basil - oh heaven. To complete the meal, I made some cold tzatziki (a future blog post) to accompany the grilled pork and the whole mish mash of goodness blended perfectly together. It was like a middle eastern thanksgiving on a warm summer sunday night.
Ingredients:
1 1/3 Cup Israeli Cous Cous
1 1/3 Cup Chicken broth, bring to a boil
1 Tbs Olive Oil
3 small zucchini, sliced lengthwise about 1/4 - 1/2 inch thick
1 red onion, cut into 8 wedges, leaving the root end holding each wedge together*
2 roma tomatoes, cut in half lengthwise
Olive Oil
Salt & Pepper to taste
1/4 Cup Sweet Basil - chiffonade
Start by cooking the cous cous. Heat olive oil in a pot, and toast the cous cous until lightly golden brown - about 5 minutes. Add the chicken broth (careful! - it will be SUPER bubbly and steamy), turn the heat down to medium - low, cover and cook until all the liquid has absorbed, about 10 - 12 minutes.
In the meantime heat the grill on high and prep the vegetables. Place the tomatoes cut side up, zucchini and red onion on a sheet pan. Drizzle olive oil over the vegetables and sprinkle salt and pepper. Once the grill put the vegetables on the grill. The zucchini will take about 2-3 minutes on each side. I like the onions a bit more caramelized, so i left them on for longer. The tomatoes should be put on the grill cut side down and grilled briefly for until there are grill marks
Once the vegetables are grilled and are cool enough to handle, roughly chop them up and add to the cooked cous cous with the basil. Salt and pepper to taste and drizzle with a bit more olive oil if desired.
*I like my red onions mostly cooked and a bit caramlized, so I cut the onion into eighths. You can cut into quarters if you like a bit of bite from the raw onion.
I've been really fortunate to have grown up with my mom as, well...my mom. She had dinner ready on the table every day and it was always a healthy & complete meal mostly consisting of white rice, a protein dominated dish (think steamed ground pork w/ chopped shitake mushrooms, or stir fried chicken of sorts), and a vegetable dominated dish. Wait...hold on just ONE sec....let me take back the "always" a healthy & complete meal. I will never forget that one time when we had popcorn and cheesecake for dinner (seriously)...but that's beside the point.

So back to the vegetable dominated dish, as a kid, I never understood why kids didn't like veggies. I always said that if kids had veggies the way my mom made them, there wouldn't be a problem. From bok choy to broccoli, she always managed to make it tasty. One of my favorite vegetables she made was peas. Not the little round single ones that you can get in frozen bags, but peas of the whole pod, like snow peas or sugar snap peas. I loved their crispy texture and the delicate sweetness that gave way at every bite. I'll also always have the fond memory of me and mom, sitting in front of the TV, preparing the peas for dinner. We'd mindlessly take peas from one pile and split them into 2 steadily growing piles. One was a pile of finished peas, ready to go into the wok, and the other pile was the tough ends and fibers that would get tossed away.
 Whether it was just peas by themselves or peas with shrimp, I knew dinner was going to be good. I also now know why we had them so often: they're quick and easy. If there was ever a dish that could carry the coveted title of a healthy, delicious, quick and easy recipe, stir fried peas would be it. Thanks, mom, for making things that are so simple, so memorable! Happy Mama's Day!!!
Ingredients
1 lb of sugar snap peas, rinsed and tough ends peeled off
1 Tbs ginger, peeled and julienned
1/2 Tbs garlic, minced
1 Tbs vegetable oil, split in half2 tsp toasted sesame oil
2 tsp toasted sesame seeds
Salt & White Pepper
Heat half of the vegetable oil in a pan pver medium high heat. Add ginger and cook for about 1 minute until fragrant. Add in snap peas and cook with a pinch of salt for about 2-3 minutes. *Here's my trick to getting yummy garlic flavor without burning it*
 Create a well in the pan with the peas. Pour the rest of the oil into the middle of the well and place garlic in the oil. Stir just the two ingredients to let the garlic infuse with the oil. Once the garlic becomes golden brown and fragrant, about 1 minute, mix in the peas. Remove pan from heat and stir in sesame oil. Salt and pepper to taste. Transfer peas to a serving bowl and sprinkle toasted sesame seeds on top. Total cooking time should be no more than 5 minutes or so to keep peas crisp.
I don't think I've ever communicated my love for chickens within this blog. Well - I LOVE CHICKENS. There, now you know. After reading Omnivore's Dilemma, In Defense of Food, and then watching Food Inc, I will forever only buy free range, pasture finished meat. Over sized chicken boobs for $1.99/lb? No thanks. I'll opt for paying a little more from a direct chicken farmer where I know the little chicadees are treated with some TLC. That place for me right now is Soul Food Farms. Every couple Wednesdays, I'll order and pick up my little fresh chicken and a dozen multicolored eggs ranging from a rich brown to baby blue, some even marked with the cutest freckles you've ever seen. For the first time last week, I also ordered 2 packets of their chicken confit which equates to 4 beautiful chicken legs that have been submerged in salt and warm duck fat then slowly cooked to practically perfection. When I pull it out of the fridge, all I have to do is put it on a skillet to crisp the skin - and voila, dinner is served. Need I say more? One day, when I garner enough duck fat from a place still unknown...I will attempt this fabulous feat of making my own delicious confit.
 What else am I loving right now? Umm...grilled artichokes. Why? They're in season, they're fun to eat, and it's hard to replicate the rich nuttiness that naturally comes out of that tender heart. Grilling gives me an excuse to be outside during the warm spring evenings, not to mention that it adds an additional depth of flavor to whatever you end up putting on the grill. What else would I want to pair with the yummy confit?

Oh...maybe something a little lighter to balance out the richness of everything else. I didn't have any salad greens and I was too antsy to get started with dinner to take the time to go to the store after work. Jicama and broccoli is what I had in my fridge, so jicama and broccoli is what I ate. Light, crisp and cool - a perfect pairing with the confit.
Ingredients
Chicken Confit - 2 legs (serves 2-3 people)
Grilled Artichokes w/ Herb Lime Dressing & Shaved Parmesan
4 small to baby sized artichokes
Juice of one Lime
2 Tbs fresh herbs, finely chopped
1/4 cup olive oil
2 tsp honey
Salt/Pepper to taste
Parmesan cheese, shaved
Jicama & Broccoli Salad
1/2 of a small jicama, diced
2 cups of broccoli florets
(uses the remaining dressing from the grilled artichokes)
Prepare the artichokes by cutting the tops off and trimming off the little leaves at the bottom. Steam then for 20-30 minutes until tender. In the meantime, make the dressing by combining the lime juice, herbs, and honey in a bowl and slowly add olive oil while whisking. Salt and pepper to taste and set aside
Using the same steamer as the artichoes, steam the broccoli florets for 3-4 minutes until tender. Remove from the steamer and allow to cool. Chop them up into little pieces and toss with the jicama, set aside
Heat the grill on high. Once the artichokes have cooled, slice in half lengthwise and gently remove the choke with a spoon if needed. Brush some of the dressing on each open half of the artichoke and put cut side down on the grill for 2-3 minutes or until brown.
As the artichokes are grilling, heat a sautee pan on medium-high heat, and place chicken confit skin side down for 4-5 minutes until the chicken is heated through and skin is crisp and brown.
To serve, toss the remaining dressing in with the jicama and broccoli. Salt and pepper the salad to taste. Shave parmesan over the top of the warm grilled artichokes and plate w/ crisped chicken confit.
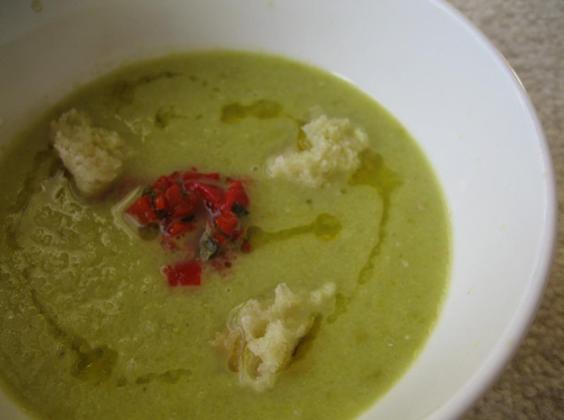
So it's been awhile since I've posted. Why? Because I lost my camera!!!! =( So sad...so so sad. I've been going through blogging withdrawals until I remembered that I have some pics (not as a pretty as I'd like, but pics none the less) of a Cucumber and Pea Gazpacho I made last summer. This recipe started out as a Cucumber Gazpacho from the Cesar cook book....so why does the title include peas? ........and so the story begins. I was having some friends over for dinner one night last year. It was after work, and I got off later than expected, so prep time was tight. In order to prepare all the menu items in time, I recruited my awesome boyfriend to help me out in the kitchen. I handed him a piece of paper: "Here, Aaron, a recipe for the the world's easiest soup. It's cucumber gazpacho. You don't need to cook it or anything 'cuz it's served cold. Just measure out all the ingredients, throw it in a bowl, stick a blender to it, throw it in the fridge, and done." It was the first time I've given him full control of a recipe for a dinner party, but it's just measuring and pouring and a little chopping, so I was sure he could handle it. Long story short - Lesson 1: 1 Cup of white wine vinegar does not equal 1/2 Cup. I look up from my slicing and dicing and look at the once new bottle of vinegar that is now about half full (see..I'm still a positive thinker here). Me: "Ummm....how much vinegar did you put in that?" Aaron: "ummm...." he looks at the recipe, then looks at the measuring cup....pauses, cocks his head to the left, "Oh shit". I didn't know whether to be upset or just laugh, so I just did the latter 'cuz Lesson 2: being upset just doesn’t solve anything.
At this point, the blender had already hit the bowl, so we couldn't exactly strain out the vinegar. We didn't have any more cucumber to double the recipe. Adding water would have made vinegar soup with cucumber essence. I needed a cold veggie that was slightly sweet and green. Think - think - think - Frozen peas!!!!! Lesson 3: Frozen peas are a good staple to have in the freezer whether it's for last minute veggie dishes, icing wounds, or fixing wounded veggie dishes. After doubling everything else in the recipe, the soup turned out great with a little bit of added sweetness from the peas, and tartness from the vinegar. Honestly – this is why I live to cook and eat. It’s an adventure everytime. For the record, I love having Aaron in the kitchen while I cook. He’s really good at chopping onions and playing the guitar for background music. Oh…and he makes the best sautéed leeks ever. Aaron – this post is dedicated to you.
Ingredients
4 cups peeled, seeded and coarsely chopped English Cucumbers (about 2 cucumbers)
4 cups frozen peas, thawed
1 1/4 Cups extra virgin olive oil
1 Cup ice water
1 clove garlic
1/2 cup white wine vinegar
2 Tbs lemon juice
2 tsp salt
1/4 tsp pepper
1/2 tsp cayenne pepper
Garnish:
Piquillo Pepper Relish:
1/2 Cup Piquillo peppers finely diced
2 Tbs fresh mint or basil
2 Tbs extra virgin olive oil
2 tsp red wine vinegar
Salt/Pepper
Fried Croutons
1 Baguette, torn into 3/4 in pieces
Extra Virgin Olive Oil
Make the relish. Combine the peppers, mint, oil and vinegar in a bowl and season to taste w/ salt and pepper. Let stand for at least half an hour before using
To make the soup, place half of each of the ingredients into a blender and blend. Set aside in a large bowl and repeat with remaining half. Cover and chill for at least one hour
To make the Fried Croutons, pour olive oil into a shallow pan until there's about 1/2 inch of oil. Heat the oil and place the torn baguette in a couple at a time, flipping over every minute, until golden brown. Set aside on paper towel.
To serve, pour the soup in a bowl and top each portion with a spoonful of the relish, a couple croutons, and a drizzle of extra virgin olive oil.